FWC F2P 8 Char Beginner Guide 1-15 + Magician 1on1 15-32 + Magician Flame HnR 32-65 + general Tips

This starter guide will save you much time if you plan to use 8 characters.
It shows how to reach level 15 with 2 characters as fast as possible, + dragging the remaining 6 along.
Additionally, a Magician route from level 15-32, becoming a Flame Geyser HnR to level 65.
Also, additional tips up to the high levels for everyone.
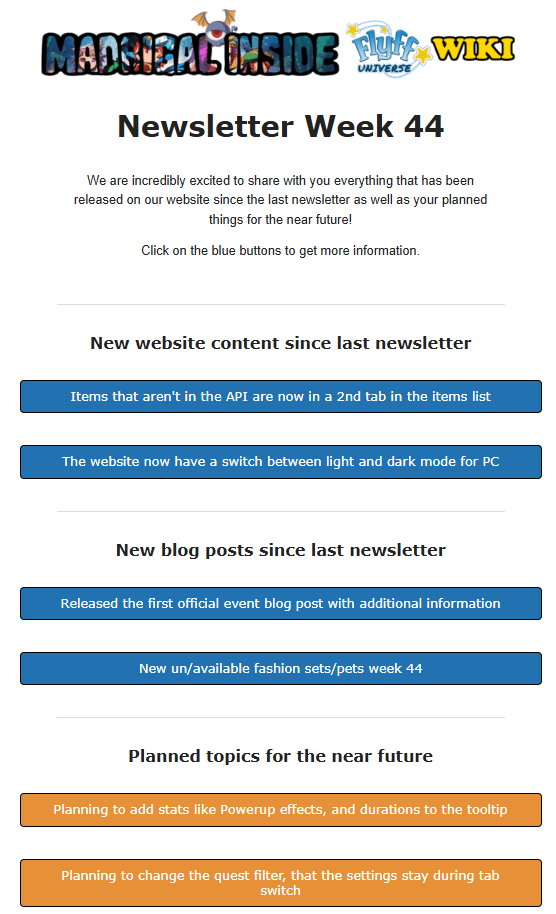
Table of Contents
Introduction
💡 Introduction:
This starter guide will save you a lot of time if you’re planning to use 8 characters.
The goal is to reach Level 15 with 2 characters within 1 hour using the pre-registration power-ups and then drag the remaining 6 along afterwards.
⚠️ Note:
The first section of this guide is useful for everyone.
The second section gives an example setup with a Magician Main DD using Flame Geyser Hit and Run from level 32, eventually transitioning to Elementor as the main class.
The third section contains general tips and info.
This is not the one and only correct way to do it—just a helpful suggestion.
The guide ends once your Main Elementor (or Ringmaster if you want constant healing contribution) reaches Level 65.
📌 Based on a video by the German content creator Spielestyler: Watch here and my own ideas (Tacota).
Party Mode Problem
⚠️ The Main Starting Problem: Party Level 10:
A big hurdle early on is your party not being Level 10 yet.
Until then, you can’t enable Contribution Mode.
You’ll struggle at first, especially with 8 characters. So don’t level all 8 right away.
Once your party is set to “Damage” later, your leechers will still gain solid EXP.
Many assume the DD levels too far ahead—wrong! They actually keep up quite well.
If your damage dealer gets 19 levels ahead, switch the party back to “Level” mode until the gap is around 15 levels again.
Starting Strategy with 8 Characters
General Rule
✅ 1. Eight Characters – Party on Damage
Problem: At the beginning, you can’t set the party to Damage yet.
This guide shows the most efficient path to unlock that.
Later, only switch the party to “Level” if there’s no other option (i.e. your DD is 19 levels ahead).
💡 Hit and Run?
Without a Hit and Run Elementor/Ranger, the 8-character tactic becomes much harder.
So: Not recommended unless you’re using HnR.
Section 1: Level 1–15 for All
1st Quest
🧭 Start with the General Lui Quest
Begin with the General Lui quest—it’s quick and gives you:
+1 Inventory Slot per character
15,700 Penya (×8 adds up!)
You’ll be around Level 4 with ~80% by the end.
Then you passively complete the New Puppy Yorrn Quest (Level 5) later:
→ 15,000 Penya ×8!
More on that later.
Prioritize
🧑🤝🧑 Prioritize the Right Characters First
After the quest:
Characters 6 to 8 stay idle for now.
Only your Main and your future Assist buffer will continue leveling.
Preparation:
Buy gear and food at the NPC for your Main and future Assist, e.g.:
300x Chocolate
5x Town Blinkwing, 5x Flaris, 5x SM Blinkwing, 5x Darkon for each of the 8 character
(To buy this, use Penya from the other 6 chars on your main.)
Placing the 6 inactive leechers
Use the Scroll of Sprint from the Lui quest and move the 6 other characters to the Billeting Place of High-Dwarpets.
This location lets you easily bring them over from Doridoma to Lawolf, where your party will gradually reach Level 10 for Contribution Mode.
Active Leveling Strategy with 1 or 2 Characters
Move to your preferred leveling spot.
Distribute all stat points to STR until level 15.
If leveling 2 chars at once: Put both game windows side-by-side on your main monitor, zoomed out.
This saves you from eye-jumping if you’re using one screen.
Assign your first Vagrant skill to level 3, put it in the Action Slot.
If you pre-registered:
Activate 1x Scroll of Amplification, 1x Vital Drink X, 1x Power Scroll, and 1x Flask of the Tiger
If you want to play a Magician later, please only use 1 Flask of the Tiger (from the Pition Box) here and the other ones (Flask of the Fox) later. One at level 15, 1 at level 18, and 1 probably at level 32 (the reason is mentioned below at the Magician section).
Use the Vagrant skill combo on each monster.
If dual leveling:
Attack with character 1
Switch to character 2 and repeat
At Level 5, put Vagrant Skill 2 to level 5, add it behind the first skill twice in the Action Slot.
As you level up:
Prioritize Skill 2 to max
Then max Skill 1
Ignore Skill 3 to save Action Slot space
Level up at Doridoma, collect:
2×4 Poporam + (optional) 4 more for job change quests
Reach party level 10
🎯 Goal: Party Level 10 = Jackpot
Once your party hits Level 10:
Bring your 6 idle chars from High-Dwarpets to your active group
Set party to “Damage”
Keep collecting quest items while leveling
Your Main and FS should level together to both hit 15 at the same time.
After picking up the 6 characters, continue at Lawolf, eventually moving on to Grownup Lawolf.
Collect:
2×4 Slain + (optional) 4 more for job change quests
Near the last tree is the “Yorrn” quest item—grab it on all 8 characters (respawn is 1–2 sec).
This is for the New Puppy Yorrn quest:
+1 Inventory Slot
15,000 Penya ×8
Once your active chars reach Level 12, skip Fefern due to their stun slowing leveling.
Move past Lawolf through the water and collect the Book of Technique with all 8 chars for job quest.
Final Monsters Before Double Job Change
Level up at Nyangnyang from 12 to level 14:
62.25% if you have Slain & Poporam (×8 each)
57.5% if including Yorrn
Both Main and FS must reach these exact EXP values.
Turn-in Quests in Flaris + Job Change
Use Blinkwing of Flaris on all 8 characters.
Turn in:
“Gems for Wands”
“Cookie Machine” / “Valin Baget”
Start the New Puppy Yorrn quest with all 8 at Loyah.
→ Main and FS should now be Level 15 / others ~Level 8
Job Change for 2 Characters
Start with one character:
Magician requires 10, Twinkle Stones and 5x Chupim.
If later characters include Blade, Knight, Psykeeper—farm 20x Chupim now. If later characters include Psykeeper, Jester, Ranger Blade, and Knight —farm 60x Twinkle Stones.
Repeat for Assist:
Assist requires 10x Forform and 5x Peakyrind.
If later characters include Billposter, Ranger, Jester—farm 20x Peakyrind now. If later character Billposter —farm 20x Forform
Note: Once you have collected the required booty quest items for your job change quest, you won’t receive any more (only normal drop rate, not the enhanced jobchange rate). To proceed with the missing items, you need to follow your character with a second one and transfer the booty quest items each time to your second character—repeat this process until you have all you need
Transferring Job Change Items to the 6 Others
Billposter, Blade, Knight → give 1x Poporam each
Psykeeper, Ranger, Jester → give 1x Slain each
Billposter, Ranger, Jester → give 5x Peakyrind each
Blade, Knight, Psykeeper → give 5x Chupim each
Psykeeper, Jester, Ranger Blade, and Knight → give 1ox Twinkel Stone each
Billposter → give 10x Forform
Section 2: Level 15–65 for Magician + FS Buffer
Flame Geyser Magician + Buff FS Focus using Pre-Register Power-Ups
Buy gear and supplies:
400x Bread for your Main
Basic equipment + weapon (Shield + Wand = more DEF)
Stick for your Assist
Use Penya from your 8 characters (drops + quests).
FS Build Setup
Skill Heal to Level 3
Magician: Max Mental Strike
Since you level only using skills with the magician, go to Options → Game Settings and disable:
Auto Attack
Single Click to Attack
Power-Leveling Route in Saint Morning
→ Maximize 1-hour usage of Power-Ups
Use Scroll of Sprint on all 8 characters
Head to Buff Pang and buff all 8
Have 7 chars follow the magician (3–4 follow FS for Cheer bonus every 10 mins)
You received an Activitionfrom job change—use it with your Magician + all Pre-Reg Power-Ups:
Scroll of Amplification
Refresher Hold
Flask of the Fox (+20 INT)
Power Scroll (+200 ATK)
Where to Level (with Monster Types & Tips)
Exit Sain City, skip the Wagsaac, turn right instead, and head directly to Small Mia
Level 15–18 → Small Mia
Yes, they’re 8 levels above you. But:
You have Power Scroll, Flask, and Activition
5x Actionslot combo is viable
At Level 18:
FS: Max Mental Sign
Magician: Max Stone Spike (great vs. the two upcoming Electric monsters)
Level 18–25 → Mantis C/B, then Mantis A
Actionslot: 5x Stone Spike
Continue until Level 25
At:
FS Level 20: Max Quick Step
- FS Level 25: Skill Haste to 17 (for casting speed) (Max it out on level 27)
Level 25–32 → Giggleboxes
Stay here until:
Your magician hits Level 32
And your other 6 chars reach Level 15
At Level 30:
Raise Blinkpool to 17, attention don’t raise it afterwards until you have the next skill Flame Geyser maxed out at 32
- You can raise Blinkpool once you Reached level 33
Level 32 → Flame Geyser Unlocked
At this point:
In the top skill row, skill the 2nd skill to level 5, so you can unlock Flame Geyser and max it
From Level 33 on: put remaining points into Blinkpool
No other skills need until Level 65
Back to Flaris/Saint City
🛠️ Prep for Next Stage + Job Change for Other 6 Characters
If available, turn in Booty Quests from Mantis and Giggleboxes to NPC Lancomi
Then:
Sell drops to NPC
Open a shop for rare loot
Do the Job Change for the remaining 6 characters
(Should be quick if you distributed quest items earlier)
Use:
Buff Pang
Quick Step / Haste from you own Buffer
Another Scroll of Sprint (if available)
After everyone finishes Job Change:
You should have enough Penya to buy 8x Hoverboards (50k each → 400k total)
Optional:
Look for a Level 30 or 45 Magician Set
Or for a Staff with Flame Geyser awakening
HnR Flame Geyser Magician
🔥 Next Power-Level Phase: HnR Flame Geyser Magician
This method involves targeting only Wind monsters using Hit-and-Run with:
Initial damage + 15x Damage over Time (DoT) hits
Preparation and route to the next level spot
Use Scroll of Sprint again on all 8 chars
Go to Buff Pang in Saint Morning, and buff your 8 characters with your Assist Quickstep Buff
Head past Wagsaac, then left of Pumpkin Town to the Hill of Shade (Captain Hobo)
Setup:
1x Flame Geyser on a hotkey
2x Flame Geyser in Actionslot
You want to:
1-shot mobs with 1 Hotkey or 2 with Actionslot Flame Geysers with 15 additional damage over Time DoT hits.
Use Blinkpool constantly to kite and reposition
This method will carry you to Level 65
Where to level– Full Hit & Run Flame Geyser Progression
Captain Hobo: Other 6 chars reach Level 20, Magician around Level 35
Cardpuppet (Small → Normal → Captain)
Normal Basque (Wind-type) in Garden of Rhisis
Leyena (Small → Normal → Captain) in Darkon
Steel Knight (Normal) → Only Wind-type here
Finish with Risem → Reach Level 60
At each new monster group:
Collect Booty Quest items
Turn them in at Lancomi (Saint Morning) or Lurif (Darkon) when your level matches
Final Steps level 60-65
🧹 Final Steps Before Elementor Job Change + Reaching 65
At Level 60, complete the Elementor Job Change quest.
Then, train only at:
Small/Normal/Captain Elderguard
Normal Garbagespider
Collect:
45x Elderguard items (Main + FS)
45x Garbage items (Main + FS)
Turn in both Booty Quests → you only need to grind to Level 64 + 58% → quest turn-ins will push you to Level 65
🎉 Congrats, you’re now a Hit-and-Run Elementor!
Elementor Skill Setup
🧠 Skill Setup at Level 65
Use your Reskill Scroll from 1st Job Change:
Magician Tree:
1st column: 5
2nd column: 7
3rd column: 7

Elementor Tree:
1st row: 5 / 4 / 5 / 4 / 5
Max Earthquake and Poison Cloud

Section 3: General Progression Tips for All (After Level 65)
What to Do After Reaching Level 65
Start collecting Booty Quests for all 8 characters at each new monster area.
Thanks to the increased drop rate on this server, it’s much easier than usual.
Turn these quests in as soon as your characters reach the required levels and before leaving the area.
💡 Example:
8× “Mong Tear” at Level 80 = 400 total = huge rewards.
Don't waste time
Avoid doing side quests and extra quests (e.g., inventory slot unlocks) right away.
The first 1–2 weeks after release will be critical for power-leveling, and this is when:
NPC drops
Green/Red set drops
Penya value per item
…are at their highest.
⏳ Save non-Booty quests for later and do them with all 8 characters at the same time to maximize efficiency.
The goal
🚀 Goal: Reach High Level Fast
The main objective is to reach high level quickly.
Doing so allows you to fully upgrade at least one full equipment set for free via the Upgrade Scrolls from the Azria and Coral Island questlines.
Fokus on Drops
🛡️ Set and Weapon Drops by Level
Here’s what you’ll get as you level up:
Captain Mushpoie (Level 80): → Level 75 set pieces (up to Normal Gongury Level 94)
Captain Gongury (Level 95): → Level 90 set pieces (up to Small Kern Level 99)
Normal Kern (Level 100): → Level 105 set pieces (up to Normal Augu Level 125)
Mutant Augu (Level 126): → Level 135 set pieces (up to Small Tigar Level 142)
Normal Tigar (Level 143): → Level 150 PvE set pieces
🎯 These weapons can be converted into Diamonds to craft a free Bloody Weapon
- Rook Popcrank (Level 115): → Level 120 weapons (up to Small Tigar Level 142)
💎 At Level 141+ – Endgame Farming
At 141 you want to do Coral Island Giants for Hernes Weapons and Wilds/Cursed Dungeons for Ultimate Jewelry Fragments, as well as Lusaka’s Crystal Weapons and 150 Set Pieces, as well as A Piercing Cards.
💎 At Level 160+ – Full Endgame Farming
At 160 you want to do the Hernes Giants and HeRnes Boss for Hernes Weapons and 150 PvE Set Pieces.
FWC Penya Potion
Available in the FWC Cash Shop (last year: 280k Penya).
This potion lasts 1 hour and gives:
+50% EXP
+50% Drop Rate
+7% PvE Damage
+5% Defense
💡 Definitely worth it—buy one every day if you can.
Daily Login Rewards
🗓️ Don’t Forget Daily Login Rewards
Press “V” to open the daily login menu.
Claim everything daily. Don’t skip it.
Money Spending!
💰 Spend Your Money Every Day
Money is generated very quickly on this server, so its valuedrops even more rapidly then on a normal server..
➡️ At the end of every day, spend all your Penya on Power-Ups.
Why?
Because Power-Up prices are tied to the F-Coin premium currency value, and those get more expensive as the economy inflates.
Additional EXP Tip
📈 Amplis & Cheer Logic
If party is on “Damage” mode → only the Main uses Amplis
If party is on “Level” mode → Leechers (characters catching up) use Amplis
Also:
✅ Use Cheer regularly
It’s not a huge buff, but across 8 characters it adds up
Always cheer simultaneously, or you’ll get uneven EXP


